Easy Crochet Market Bag


Sometimes it is so hard to come up with spring and summer things to crochet but this market bag is perfect!!! It's easy, adorable, functional and so fun to make. You can make it in cotton yarn or acrylic yarn. I used a leftover half of a Caron Big Cake to make this one and it was the perfect amount of yarn. Market bags are big this spring and summer too! If you don't want to use it for holding your fresh fruits and veggies, you can use it as a beach bag, packing snacks for a park day or a picnic or using it as a diaper bag for your littles.

What you'll need:

  • 5 or 6 mm crochet hook
  • approximately 350e yds of cotton or acrylic yarn (I used half a Caron Big Cake)
  • scissors
  • yarn needles
  • stitch marker

Abbreviations:

  • Chain (ch)
  • Single crochet (sc)
  • Half double crochet (hdc)
  • Double crochet (dc)

Instructions:

Round 1: ch 4, (last 3 ch count as 1st dc) 11 dc in first ch. Slip stitch to join. (12 stitches)
**pattern note** use a stitch marker to mark the last stitch to keep track of the rounds
Round 2: *ch 4, sc in next dc; repeat from * to the end of the round. (12 spaces) -move stitch marker
Round 3: *ch 4, sc in next ch 4 space; repeat from *
Round 4: repeat round 3
Round 5: *ch 4, sc in next ch 4 space, ch 4, sc in next ch 4 space, ch 4, sc in same ch 4 space; repeat from *. (18 spaces)
Round 6: repeat round 3.
Round 7: increase in every 3rd space. (increase is the same as round 5)
Round 8: repeat round 3
Round 9: repeat round 7
Round 10-13: repeat round 3
Round 14-16: repeat round 7
Round 17-32: repeat round 3
Round 33: ch 2, 3 hdc in every ch 4 space. slip stitch to join
Round 34-35: *ch 2, hdc in next 2 stitches, skip every 3rd stitch; repeat from *. slip stitch to join
Round 36-38: ch 2, hdc in every stitch. slip stitch to join

Strap:

Row 1: ch 1, sc in next 10 hdc stitches. ch 1, turn.
Row 2-94: *10 sc, ch 1, turn; repeat from * till end of row 94. 
**leave about a 12 inch tail to sew the strap to the other side of the bag.**
Weave in ends and the bag is finished!!


pub-2537575722452096

Chunky Mermaid Tail Blanket


Okay, so I worked on this blanket about 2 weeks. It was so simple and I just kind of went with it. This is a super super basic mermaid tail blanket. Perfect for beginners! It only uses a couple stitches and then some sewing at the end. My kiddos love this blanket because it is so soft and extremely warm! I made it with Lion Brand Hometown USA yarn in Phoenix Azalea and it took 10 skeins for a lap size blanket. If you want it to be able to cover your arms too, I'd add 2-3 more. Or if you want it to be kid size, you'll probably only need around 8. This pattern makes it really easy to adjust it to the size you want.
This is also a good project for a birthday or Christmas gift. It only took me about 2 weeks to make it but I was working on some other projects in between. You know how it is, can't ever just have one project at a time. I know I'm guilty of having at least 6 right now. 🙈 

What you'll need:

  • 10 mm or 11 mm crochet hook (this pattern works with both)
  • 10 skeins of chunky yarn
  • scissors
  • yarn needle

Abbreviations:

  • Chain (ch)
  • Single crochet (sc)
  • Half double crochet (hdc)
  • Double crochet (dc)
  • Slip stitch (sl st)
  • Back loop (bl)

Instructions:

Tail

Ch 30
Row 1- hdc in the 3rd chain and hdc across the row.
Row 2- ch 2, turn, hdc in bl
*Row 3- ch 2, turn, hdc in bl till 2nd to last stitch.
Row 4, ch 2, turn, hdc in bl across the row.*
 Repeat * to * till end of row 14.

*Row 15- ch 2, turn, hdc in bl till end of row. 2 hdc in last stitch.
Row 16- ch 2, turn, hdc in bl till end of row.*
 Repeat * to * till end of row 26.

Connect tail on the straight side with a sl st. You'll start working on the body from there.

Body

Starting at the sl st
Round 1- ch 1, sc around the edge, sl st to join. (you should have about 38 stitches)
Round 2- ch 2, hdc in each stitch in the round. sl st to join.
Round 3- ch 2, *hdc in next 2, 2 hdc in every 3rd stitch* 
     Repeat * to * till end of the round. sl st to join.
Round 4- ch 3, *dc in next 4, 2 dc in every 5th stitch*
     Repeat * to * till the end of the round. sl st to join.
Round 5-9- ch 3, dc in each stitch in the round. sl st to join. *don't join at the end of round 9*
Row 10-35- ch 3, turn, dc till the end of the row.
Row 36- ch 1, sc across till the end of the row. 

Fold the edges of the tails up to where the tail and body connect, use your yarn needle to sew about 5 stitches together on both sides of the tail. 

You can close the bottom but I left mine open because I like to be able to stick my feet out the bottom.

Then you just weave in the ends and it is finished!! 


pub-2537575722452096

What to do with all your scrap yarn!!


So I'm sure you also have a big stash of scraps and leftover yarn like I do! Now the question is, what do we do with it! Well I have a few good ideas for that. I know I have a bunch of leftover yarn and I am always trying to come up with new ideas for it.


Scrap Yarn Blanket

This is probably one of the easiest ways to use up most of the leftover yarn scraps you have! There are so many different ways you could do it too. Granny squares, granny stitch, V stitch, C2C and a ton more! I have one finished with a granny stitch and another one started with the V stitch. If you don't have a lot, then you can always make a baby blanket too!! 


Pom Poms

Duh!! Pom poms are amazing and we can use them for so much stuff!! You can make a pom pom rug, make poms to put on top of your hats, add some poms to the corners of you blankets, or just make them for your kids to have a "snowball fight"! My kids love the throw them at each other! 


Popsicle Holders

Popsicle holders for your little people! Instead of using all those paper towels to wrap around the popsicles to keep their little hand warm, you can make some super cute holders. Little Star Wars ones are so adorable because then it looks like they are holding little light sabers. You can do other character ones, or just make it rainbow if you have a bunch of different colors! 
Need a quick 15 min 1 stitch pattern for this - click here.


Cup Cozys

Cup cozys are so easy to make and are super cute!! You can make a bunch of them with the scrap yarn and then use other colors to make little flowers or a unicorn horn to add onto it! You can also add little charms on to them too! This is another easy and super fun project to do and you can totally give these as gifts to your friends!!

Cat Coaster

 Cat coasters are so easy to make too and they are a great way to use up some of those bigger balls of leftover yarn! Just click the link to go to my pattern for these! You can make these really quick too so they are perfect if you need a last minute gift or something else to add to your craft fair! Click here for the pattern to make these!

pub-2537575722452096

15 Minute Crochet Popsicle Holder

This is literally the easiest thing I've made! It takes 15 min (maybe less but I have a 4 year old who requires my attention every 30 seconds) and it's great because then you aren't using a million paper towels for the popsicles. Especially in the summer time! I know here in VA it starts getting warm at the end of Winter and my kids are ready for popsicles as soon as the temps hit the 70s. You can even use your scrap yarn to make these! So here it is!

What you'll need:

  • Some yarn in whatever color you feel like using! I used some leftover Red Heart yarn.
  • 5 mm crochet hook
  • scissors 
  • yarn needle

Abbreviations:

  • Chain (ch)
  • Half Double Crochet (hdc)
  • Slip Stitch (sl st)


Instructions:

When you make your slip knot, you'll want to leave the tail long (around 6-8 inches). I accidentally left mine short so the end was a struggle. 

Ch 17, connect so you are working around.
Round 1-11- Ch 2, hdc all the way around till the end, sl st to join.
Use your yarn needle to sew the bottom with the tail.
Weave in your ends.
The end! Now you have a popsicle holder! 


pub-2537575722452096

Awesome yarn storage ideas!!


I am always trying to figure out exactly how I want to organize my yarn! I can't wait till I can finish setting up a craft room or "donating" a wall in my bedroom to all my crafts. Until then, I will continue to find other ways around my house to contain my yarn. Right now I have my yarn in two different places, one of those cool 3 tiered rolling carts (mine is not from ikea, I got it at Aldi's) in my living room and that holds my laptop and notebooks and all the yarn things I use on a daily basis. It's a mobile office! That way it doesn't get out of control and look like "mom's yarn stuff" exploded in the living room. It's all in one spot and the kids know that it's my stuff. I can't tell you how many times I found my toddler "yarning just like mommy" and then I have to spend 30 min untangling what she created.


In my bedroom, I have a bookshelf (got it at target for super cheap, just needed something temporary) that holds all the yarn I don't have a project for yet and a crate full of all my yarn balls. On top, I have two baskets that hold my finished hats and scarves (still trying to find a place for my finished blankets). It works out pretty good right now. I just always hated putting my yarn in a tote and sticking it in the closet or under the bed because I like to look at it. 😂 I'm sure I am not alone in feeling that way!

It's not perfect right now but it works. Next project, hanging crates on the wall above my desk in my room and then that will become the new yarn station! I'll let y'all know how it turns out! pub-2537575722452096

Super Easy Cat Coaster!!


I love making these!! Definitely one of my favorite fast projects and they are so cute!! I mean, who doesn't love cats!! These are so simple to make and you can do them in whatever colors you want and these work up so fast, you can make a full set in less than a day!


Super adorable, right? So these I did in an ivory tweed and brown but it works for whatever colors you want to do! I also used Hobby Lobby's I Love This Yarn! It is one of my favorites to use because it is so soft! This could totally work for whatever yarn you want to pick too and you could even use some of your leftover yarn balls you keep stashed! 

What you'll need: 

  • 6 mm crochet hook
  • yarn (duh! 😺) As long as it is medium weight (4)
  • scissors
  • yarn needle

Abbreviations:

  • Chain (ch) 
  • Slip Stitch (sl st)
  • Single Crochet (sc)
  • Half Double Crochet (hdc)
  • Double Crochet (dc)


Instructions:

So, when I start these I like to do the slip not with the short end so that way I can pull it tight when I am finished. That way you don't end up with a big hole in the center.
Round 1- Ch 4, 9 dc in the 4th ch from the hook. sl st to join.
Round 2- Ch 3, 2 dc in each stitch till the end of the round. sl st to join.
Round 3- Ch 3, *2 dc in 1st stitch, 1 dc in next stitch* Repeat * to * till the end of the round. sl st to join.
Round 4- Ch 3, *dc in the next 7 stitches. 2 dc in every 8th stitch* Repeat * to * till the end of the round. sl st to join.

For the ears, you'll work backwards around.

(Ear 1) ch 1, sc in 1st stitch to the left of ch, hdc in next stitch, 2 dc in next, ch 2, 2 dc in same stitch, hdc in next, sc in next, sl st in next 4 stitches, (Ear 2) sc in next, hdc in next, 2 dc in next stitch, ch 2, 2 dc in same stitch, hdc in next, sc in next, sl st in next 2 stitches. 

Weave in ends and then you have kitty coasters!! 


pub-2537575722452096

How to crochet a bun hat with an elastic hair tie!


I love this bun hat! One of my favorite ones I've made so far! Its so cute, so warm and it's a little slouchy (of course its also super easy to make it more fitted just by leaving out a few rows and I will make a note in the pattern where you can do that). I made this one for my friend and she loved it, especially since she has had a hard time finding a bun hat that fits comfortably over her dreads. I also used one of the giant hair ties so it's ten times easier to stretch over your bun! 

What you'll need:

  • Elastic hair tie
  • 2 skeins of yarn (I used I Love This Yarn from Hobby Lobby, and you won't use the full two skeins.)
  • yarn needle
  • scissors
  • 6 mm crochet hook

Abbreviations:

  • Chain (ch)
  • Slip Stitch (sl st)
  • Skip (sk)
  • Single Crochet (sc)
  • Double Crochet (dc)

Instructions:

You'll start by doing your chain around the elastic hair tie. Ch 53 around the hair tie.
sl st to join
Round 1- ch 3, dc in each ch around. sl st to join.
Round 2- ch 3, *dc in the next 15 stitches, 2 dc in next stitch*, repeat * to * till the end of the round. sl st to join.
Round 3- ch 3, dc in each stitch around. sl st to join.
**Round 4- (switch colors) ch 3, *2 dc in next stitch, sk*, repeat * to * till the end of the round. sl st to join.
Round 5- (switch colors) ch 3, *2 dc in next stitch, sk*, repeat * to * till the end of the round. sl st to join.**
**repeat rounds 4 and 5 till you reach round 15 (or round 12/13 for a more fitted hat)**
(switch to the opposite color from the top of the hat)
Round 16-20- Ch 1, sc in each stitch in the round. sl st to join.
Weave in the ends.


pub-2537575722452096

How to make a bun hat in less than 2 hours


Super easy and super basic bun hat pattern. It took me less than 2 hour to make one of these and they are so warm! I didn't do this one with an elastic hair tie so you don't need to worry about getting one of those! If you are looking for a pattern for a bun hat with the hair tie, I will be doing that next!

What you'll need:

  • 8 mm crochet hook
  • 1 skein of a chunky yarn. I used Loops & Thread Cozy Wool.
  • Yarn needle
  • scissors

Abbreviations:

  • Chain (ch)
  • Slip stitch (sl st)
  • Half double crochet (hdc)
  • Double crochet (dc)

Instructions:

Ch 46, join so you are working in the round.
Round 1-4 - ch 2, hdc in every stitch until you reach the end of the round. sl st to join.
Round 5- ch 3, dc in next stitch. 2 dc in every other stitch, (decrease by 2 in this round) sl st to join.
Round 6-9 - ch 3, dc in next stitch, 2 dc in every other stitch, (decrease by 3) sl st to join.
Round 10- ch 3, dc in next stitch, 2 dc in every other stitch (decrease by 2) sl st to join.
Round 11- ch 3, dc in next stitch, 2 dc in every other stitch (decrease by 3) sl st to join.
Round 12- sl st in every stitch around. 
Weave in ends.

Adorable Pom Pom Baby Blanket


I made this super easy Granny square blanket for my youngest and added some poms on the corners because who doesn't love poms!! She loves it and it is super soft and the poms make it easy for her to drag it around wherever she goes. I didn't follow any pattern. Just started with a granny square and kept going until it was the size I wanted and then added the poms! This would make the perfect gift for anyone in your life who is about to have a new baby or has already had one! Everyone loves a handmade gift. I'll tell you how I made mine!

What you'll need:

  • 3-4 skeins of whatever yarn you feel like using. I used 3 sweet rolls.
  • 5.5 mm crochet hook
  • yarn needle
  • scissors
  • pom maker

Abbreviations:

  • Chain (ch)
  • Double Crochet (dc)
  • Slip Stitch (sl st)
  • Skip (sk)

Instructions:

Start by Ch 4. Do 2 dc in 4th ch from the hook. *ch 2, 3 dc in same stitch.* 
repeat * to * 2 more times till you have a square. sl st to join and then sl st across to the corner. 
Row 2 - ch 3, 2 dc in same corner. ch 3, 3 dc in corner. *ch 1, 3 dc in next corner. ch 3, 3 dc in same corner.*
 repeat * to * 2 more times around the square. sl st to join and sl st across to the next space. 
*Row 3- ch 3, 2 dc in space. ch 1, 3 dc in next space (corner) ch 3, 3 dc in same space. ch 1, 3 dc in next space. 
Repeat until you've worked all the way around the square. sl st to join.

*Repeat steps in row 3 around until desired size of baby blanket (or adult blanket)

Once you've reached the end, weave in the ends and add your pom poms!! 


pub-2537575722452096

Easy Knit Toddler Hat


I am a newbie to knitting but I love it so much already. I think I have made 6 hats so far after just learning how to knit in the round on circular needles around 2 weeks ago. It was definitely a lot different than crocheting, that's for sure! This is probably my favorite hat I have made so far. It is a little toddler/kid beanie I made with some leftover Caron Sprinkle Cake yarn and it turned into a cute little cupcake hat! My 4 year old loves this one! But here is how I made it so y'all can see how easy it is too! (Keep in mind, I am a newbie knitter so I am still not 100% sure on all the knitting terms)

What you'll need:

  • 10 mm circular knitting needles (16 in)
  • yarn needle
  • scissors
  • stitch marker
  • 1 skein of chunky yarn

Instructions:

Cast on 34 stitches. Join so you are working in the round and mark that 1st stitch with your stitch marker to keep track of your 1st stitch for the round. 
I used the knit stitch all the way up for 26 rows. 
Then I trimmed the tail to around 18 inches, fed it through the last row of stitches on my needles, cinched and tied off. 
Topped the hat with a pom!


pub-2537575722452096

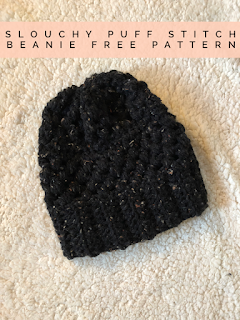
Slouchy Puff Stitch Beanie


I didn't follow a pattern for this hat. I just kind of worked it up with no goal in mind but when I finished it, I loved it! So...I figured I would share it with y'all. It is super cute, super soft, and so warm. Probably one of my favorite beanies I've made so far. This one I made for my Mom. It works up pretty quick too as long as you are familiar with the puff stitch.


What you'll need: 

  • 2 skeins of whatever color you'd like to make your hat in. I made mine with Loops & Threads Charisma Tweed yarn in Black.
  • A yarn needle
  • scissors
  • 9 mm crochet hook

Abbreviations:

  • Chain (ch)
  • Slip Stitch (sl st)
  • Single Crochet (sc)
  • Half Double Crochet (hdc)
  • Skip (sk)
  • Puff Stitch (ps)
  • Back Loop (bl)

Instructions:

So we will start out with the band of the hat. 

Ch 10
Row 1- Hdc in the 3rd ch from the hook and continue till you reach the end. (you'll end up with 9 hdc)
Row 2- ch 2, turn, hdc in bl of 1st stitch and continue till the end of the row.
-Repeat row 2 until you reach 24 rows total. Sl st the ends together to form the band. 

Body: 

Ch 1 and work sc all the way around the band. You will end up with around 40 stitches. If you end up with a different count, that is fine as long as the number is even. 

Round 1- Ch 2, ps in 1st stitch in the round. ch 1. *sk. ps in next. ch 1* 
         repeat * to * in the round. When you reach the end, sl st to join.
Round 2-4- ch 2, ps in the ch stitch, ch 1, *sk, ps in next, ch 1* 
         repeat * to * in round. sl st to join.
Round 5-6- ch 2, hdc in 1st stitch and every stitch in the round. sl st to join.
Round 7- Ch 2, ps in 1st stitch in the round. ch 1. *sk. ps in next. ch 1* 
         repeat * to * in the round. When you reach the end, sl st to join.
Round 8-9- ch 2, ps in the ch stitch, ch 1, *sk, ps in next, ch 1* 
         repeat * to * in round. sl st to join.
Round 10- ch 2, hdc in ever stitch in the round. sl st to join.

Cut your tail to be about 18 in long. Use your yarn needle to feed the tail through every 3rd stitch. Pull as tight as you'd like to cinch the top together. Tie off and weave in the ends. 


The picture I have at the top of this post is the hat before I cinched the top. Here is the finished hat! I hope you love the hat as much as do! 


pub-2537575722452096

How to make super adorable Unicorn Coasters!!


This is for all my unicorn lovers!! These unicorn coasters are the bomb! Who doesn't love unicorns? Even my kids love to use them and it's a great way to finally get the kiddos to stop making rings on my tables with their cups! And.....they can totally make the perfect gift for your unicorn loving BFF! So let's get started!

What you'll need:

  •  1 skein of a white or off white yarn. I used ILTY from Hobby Lobby in Ivory Tweed.
  •  I used ILTY in Dark Neons for the flower crown and some leftover pink yarn in my scrap bucket for the horns. (Any color combo you choose will work with this pattern)
  • 6 mm crochet hook (size J)
  • scissors
  • yarn needle

Abbreviations:

  • chain (ch)
  • slip stitch (ss)
  • single crochet (sc)
  • half double crochet (hdc)
  • double crochet (dc)

Instructions: 

Coaster body:

Ch 4. 
Round 1- dc in first ch (4th ch from the hook). 8 more dc in same stitch. ss in ch 3 to join. ((9 dc total)
Round 2- ch 3. *2 dc in next stitch. 3 dc in every other stitch.* repeat * to * till the end of the round. ss in ch 3 to join. (24 dc total)
Round 3-  ch 3. *2 dc in next 2 stitches. 1 dc in every 3rd stitch.* repeat * to * till the end of round. ss in ch 3 to join. (38 dc total)
Round 4- ch 3. *dc in next 3 stitches. 2 dc in every 4th stitch.* repeat * to * till the end of the round. ss in ch 3 to join. (52 dc total)

For the ears: in the same stitch you ended Round 4 on, you are going ch 1, hdc in stitch behind joining stitch of round 4. 3 dc in next stitch going backwards. ch 2. 3 dc in same stitch. hdc in next stitch. ss in next 6 stitches. hdc in next stitch. 3 dc in next stitch. ch 2. 3 dc in same stitch. hdc in next stitch. ss in next 2 stitches and tie off. 

Horn: 

Ch 6. sc in 2nd chain from the hook. hdc in next 2 stitches. dc in last two stitches. ss all the way around to create smooth edges for the horn. Attach horn by sewing to the top of the body with your yarn needle.

Flowers: 

Ch 4. dc in 1st ch. ch 2. ss in 1st ch. (1st petal)
Petal 2- * ch 3. dc in same stitch. ch 2. ss in center.*
Petals 3-5 - repeat * to * 

Make 3 and then connect to the body as a flower crown.

Weave in all your ends and then your coaster is complete!! 


pub-2537575722452096

Rose Baby Beanie


This is a super cute and super easy baby beanie that doesn't take a ton of time to make! This pattern works up real quick and doesn't take a lot of yarn either. So it's the perfect project for those balls of yarn you have leftover that have been sitting in your stash for months! Let's get to it!


What you need:
  • 1 skein of chunky yarn. I used Loops & Thread Charisma yarn. You can use anything similar to that.
  • Yarn needle
  • 9 mm or 8 mm crochet hook. I used a 9 mm but both will work for this pattern.
  • scissors
Abbreviations:
  • Chain (ch)
  • Half Double Crochet (hdc)
  • Slip stitch (ss)
Instructions:

Ch. 14
Row 1: Hdc in the third stitch from the hook. Hdc in each stitch (total of 12 hdc)
Row 2-13: Ch 2, turn, hdc in back loop of next stitch. Hdc in back loop of each stitch in row. Repeat till the end of row 13.
Leave the tail about 18 inches long. Use the tail and your yarn needle to sew the short ends together and then weave the tail through the top to cinch it. Tie it off and add your pom pom! 


What to do with all your scrap yarn!!

So I'm sure you also have a big stash of scraps and leftover yarn like I do! Now the question is, what do we do with it! Well I have ...